So after getting my Juniper EX4300 configured manually, I figured I should probably automate this stuff. Got my CCNA and always heard about Ansible but never really messed with it. Time to change that.
This is basically my notes on setting up Ansible to manage Juniper gear. Nothing fancy, just what worked for me.
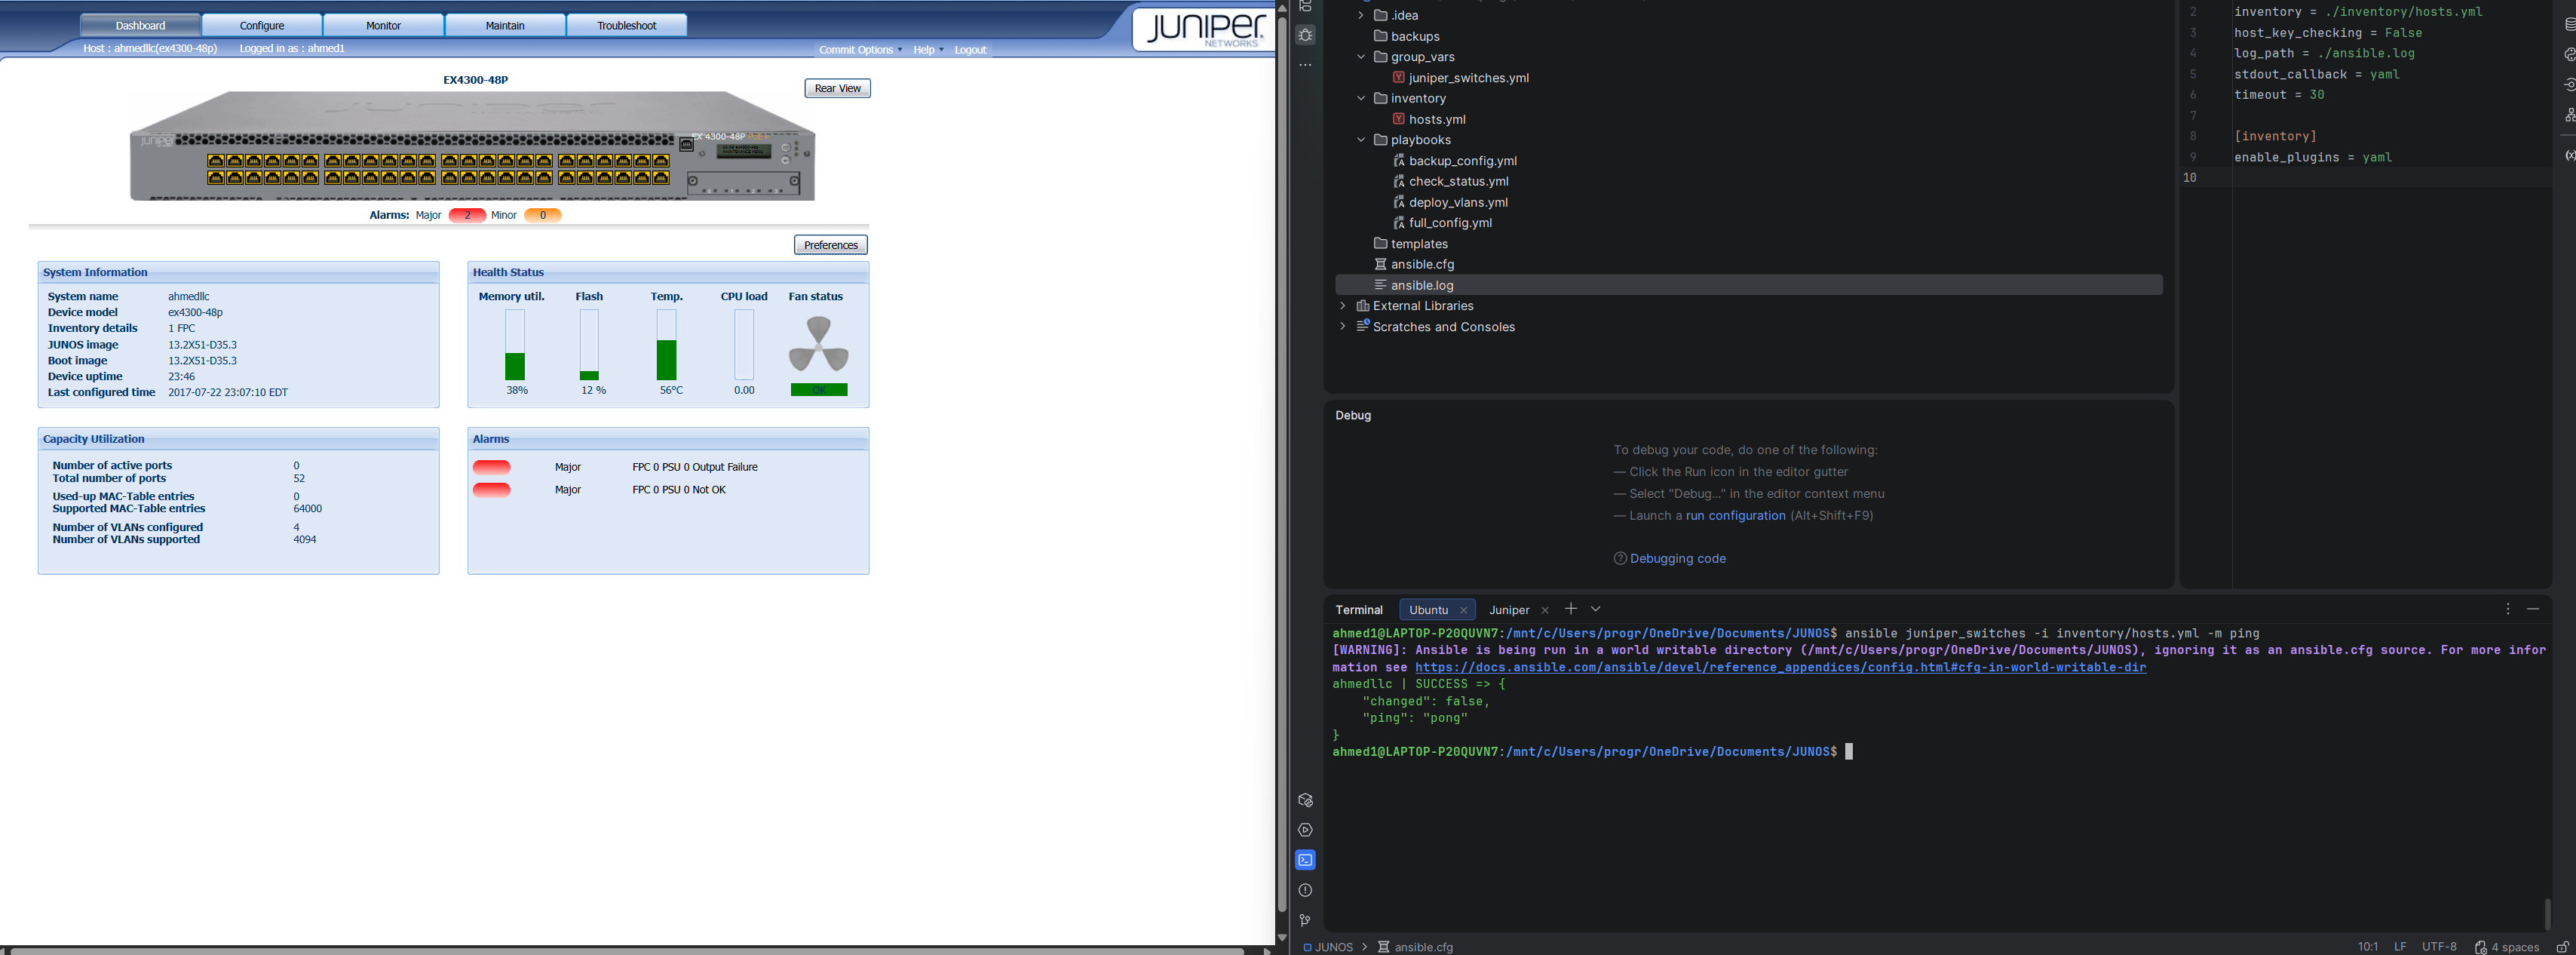
✅ 1. Prove Connectivity and Collection is Working
This uses the basic ping module to confirm Ansible can log in to your device using the credentials in your inventory, and that the connection type (netconf) is working.
| Command to Run | Purpose |
|---|---|
ansible juniper_switches -i inventory/hosts.yml -m ping |
Confirms SSH/NETCONF login is successful. |
✅ 2. Run an Operational Command
This shows you can execute a specific Junos operational command on the switch, proving you can retrieve real-time data using the junipernetworks.junos.junos_command module.
| Command to Run | Purpose |
|---|---|
ansible juniper_switches -i inventory/hosts.yml -m junipernetworks.junos.junos_command -a "commands='show version'" |
Demonstrates live data retrieval from the device. |
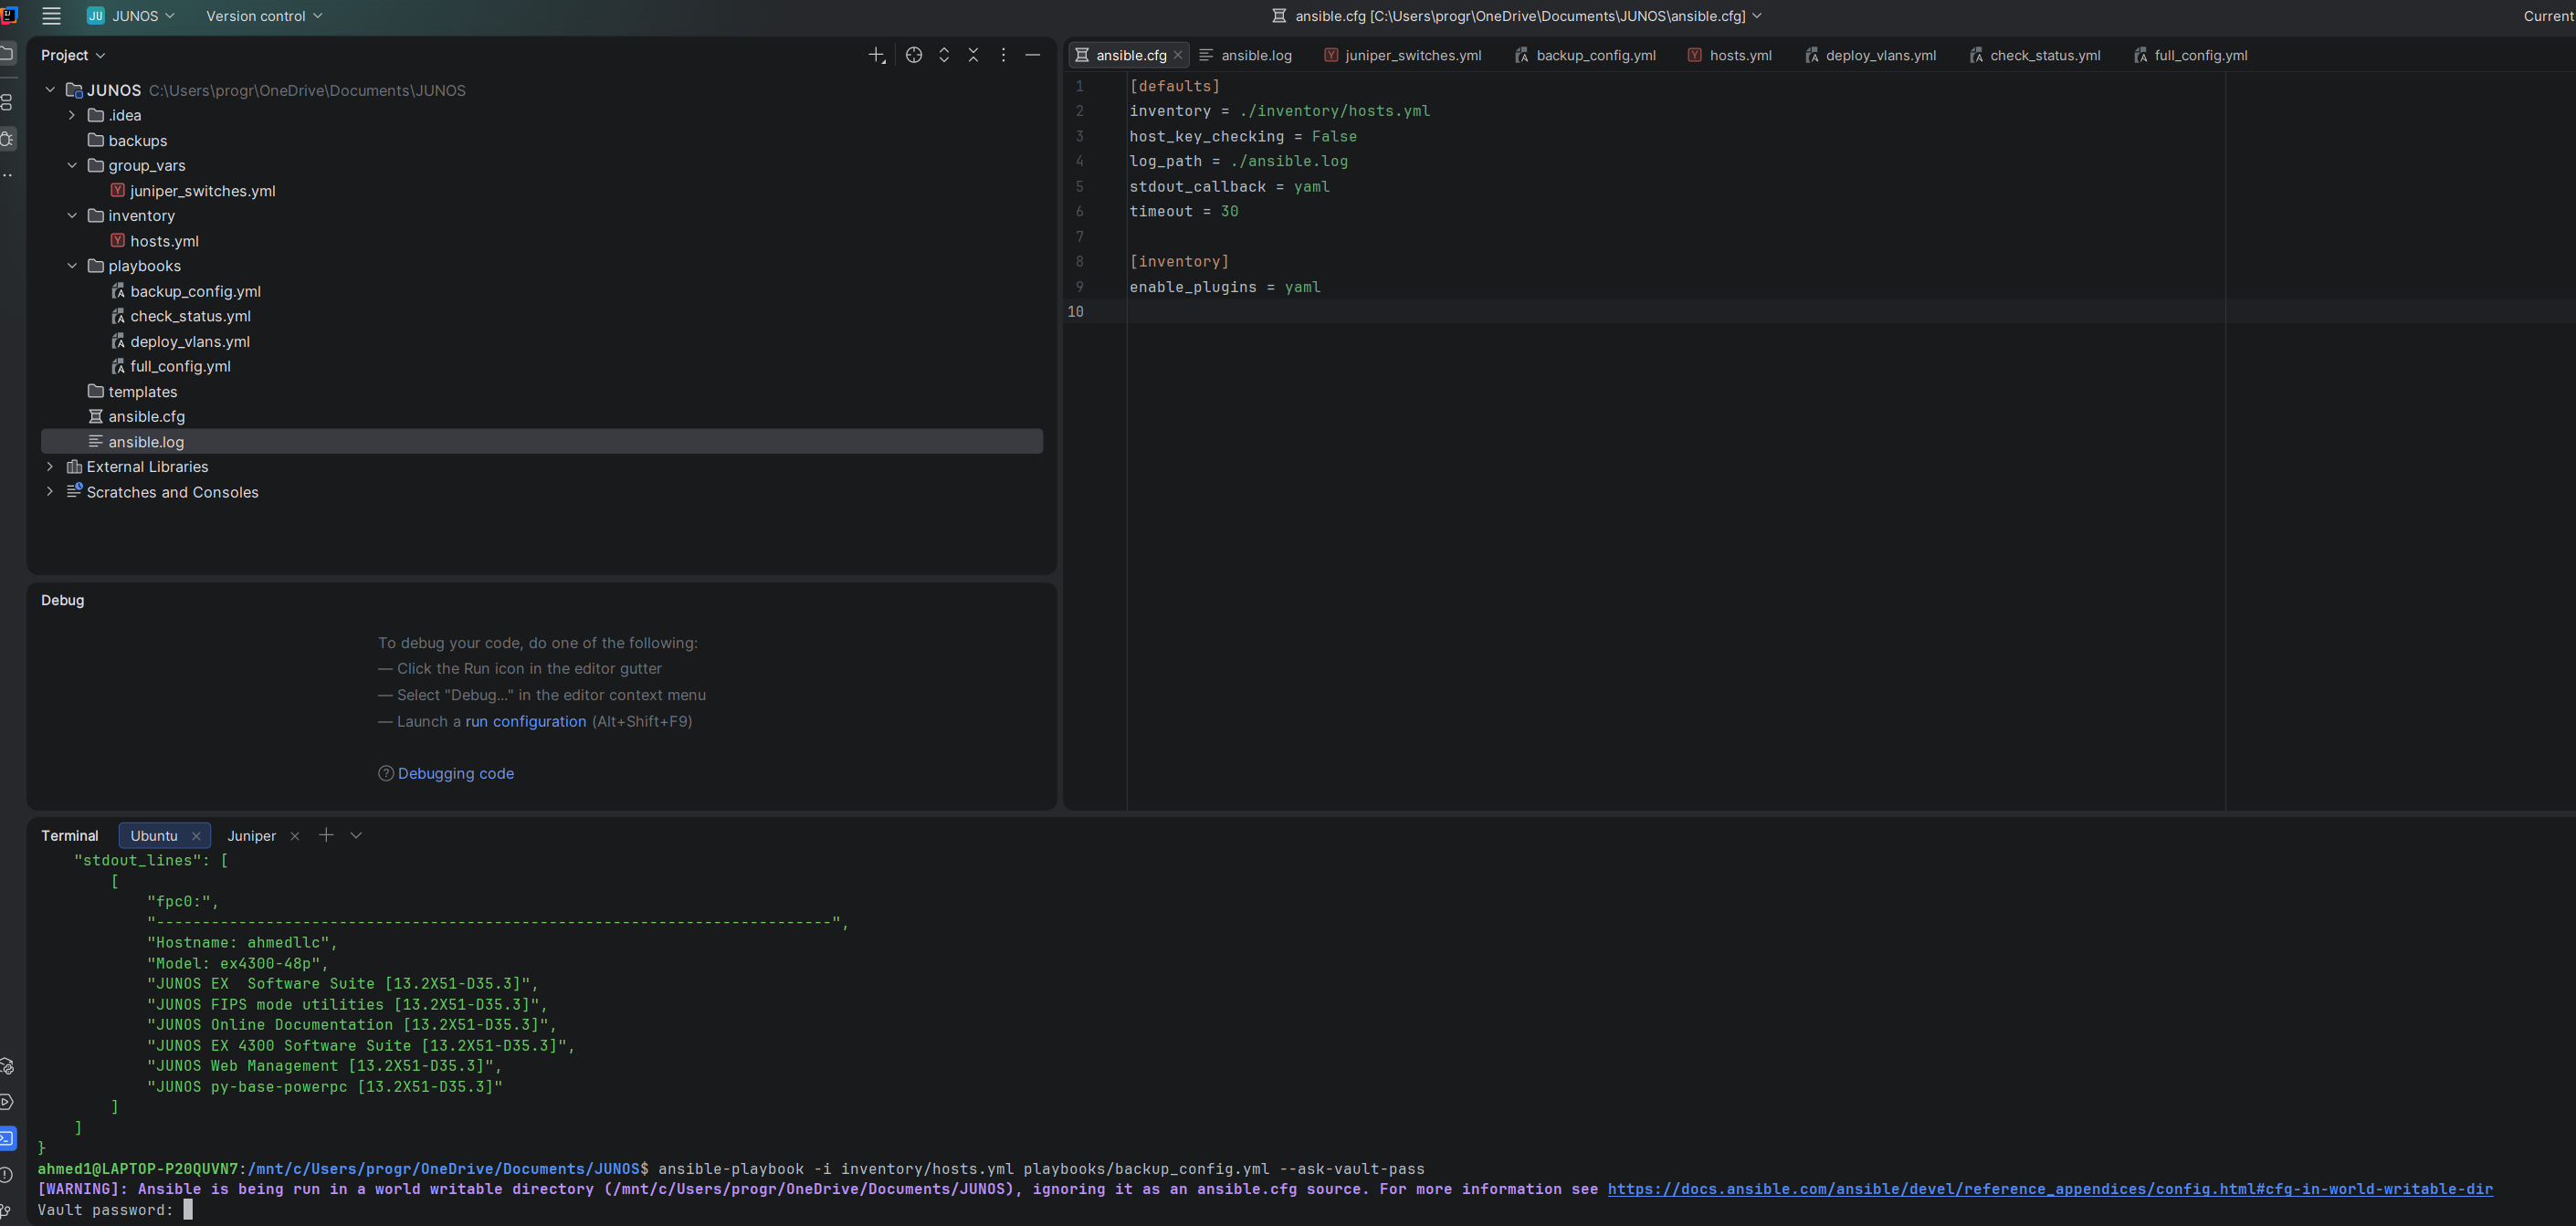
✅ 3. Run the Automated Backup Playbook
This is the most important demonstration of your work. It proves the playbook logic, file system permissions, and variable usage are correct. Since you documented using Vault, add the secure flag.
| Command to Run | Purpose |
|---|---|
ansible-playbook -i inventory/hosts.yml playbooks/backup_config.yml --ask-vault-pass |
Executes the multi-step backup process using the secure Vault password. |
Why Bother with Ansible?
Look, typing the same commands over and over gets old fast. Plus if I add more switches later, I don't want to configure each one manually. Ansible lets you:
- Push configs to multiple switches at once
- Backup configs automatically
- Roll back if you mess up
- Actually document what you're doing
Coming from Cisco, I know this stuff matters. Might as well learn it now.
What You Need
Software:
- Linux (I'm using WSL on Windows)
- Ansible
- Python 3
- Juniper Ansible collection
On the Switch:
- SSH enabled (already done)
- NETCONF enabled (comes with SSH on Junos)
- A user account with permissions
That's it. Pretty straightforward.
Step 1: Installing Ansible
# Update packages
sudo apt update

# Install Ansible
sudo apt install ansible -y

# Verify it worked
ansible --version
You should see something like "ansible 2.x.x" - exact version doesn't matter much.
Step 2: Install Juniper Collection
Ansible needs Juniper-specific modules to talk to JunOS devices.
ansible-galaxy collection install junipernetworks.junosThis downloads all the Juniper stuff you need. Takes a minute.
Step 3: Project Structure
I created a folder called JUNOS to keep everything organized. Here's the structure:
JUNOS/
├── ansible.cfg              # Ansible settings
├── inventory/
│   └── hosts.yml           # List of switches
├── group_vars/
│   └── juniper_switches.yml # Common variables
├── playbooks/
│   ├── backup_config.yml   # Backup playbook
│   ├── deploy_vlans.yml    # VLAN deployment
│   └── check_status.yml    # Status check
├── backups/                # Where backups go
└── templates/              # For future templates
Create it all at once:
mkdir -p ~/JUNOS/{inventory,playbooks,group_vars,backups,templates}
cd ~/JUNOS
Step 4: Ansible Configuration
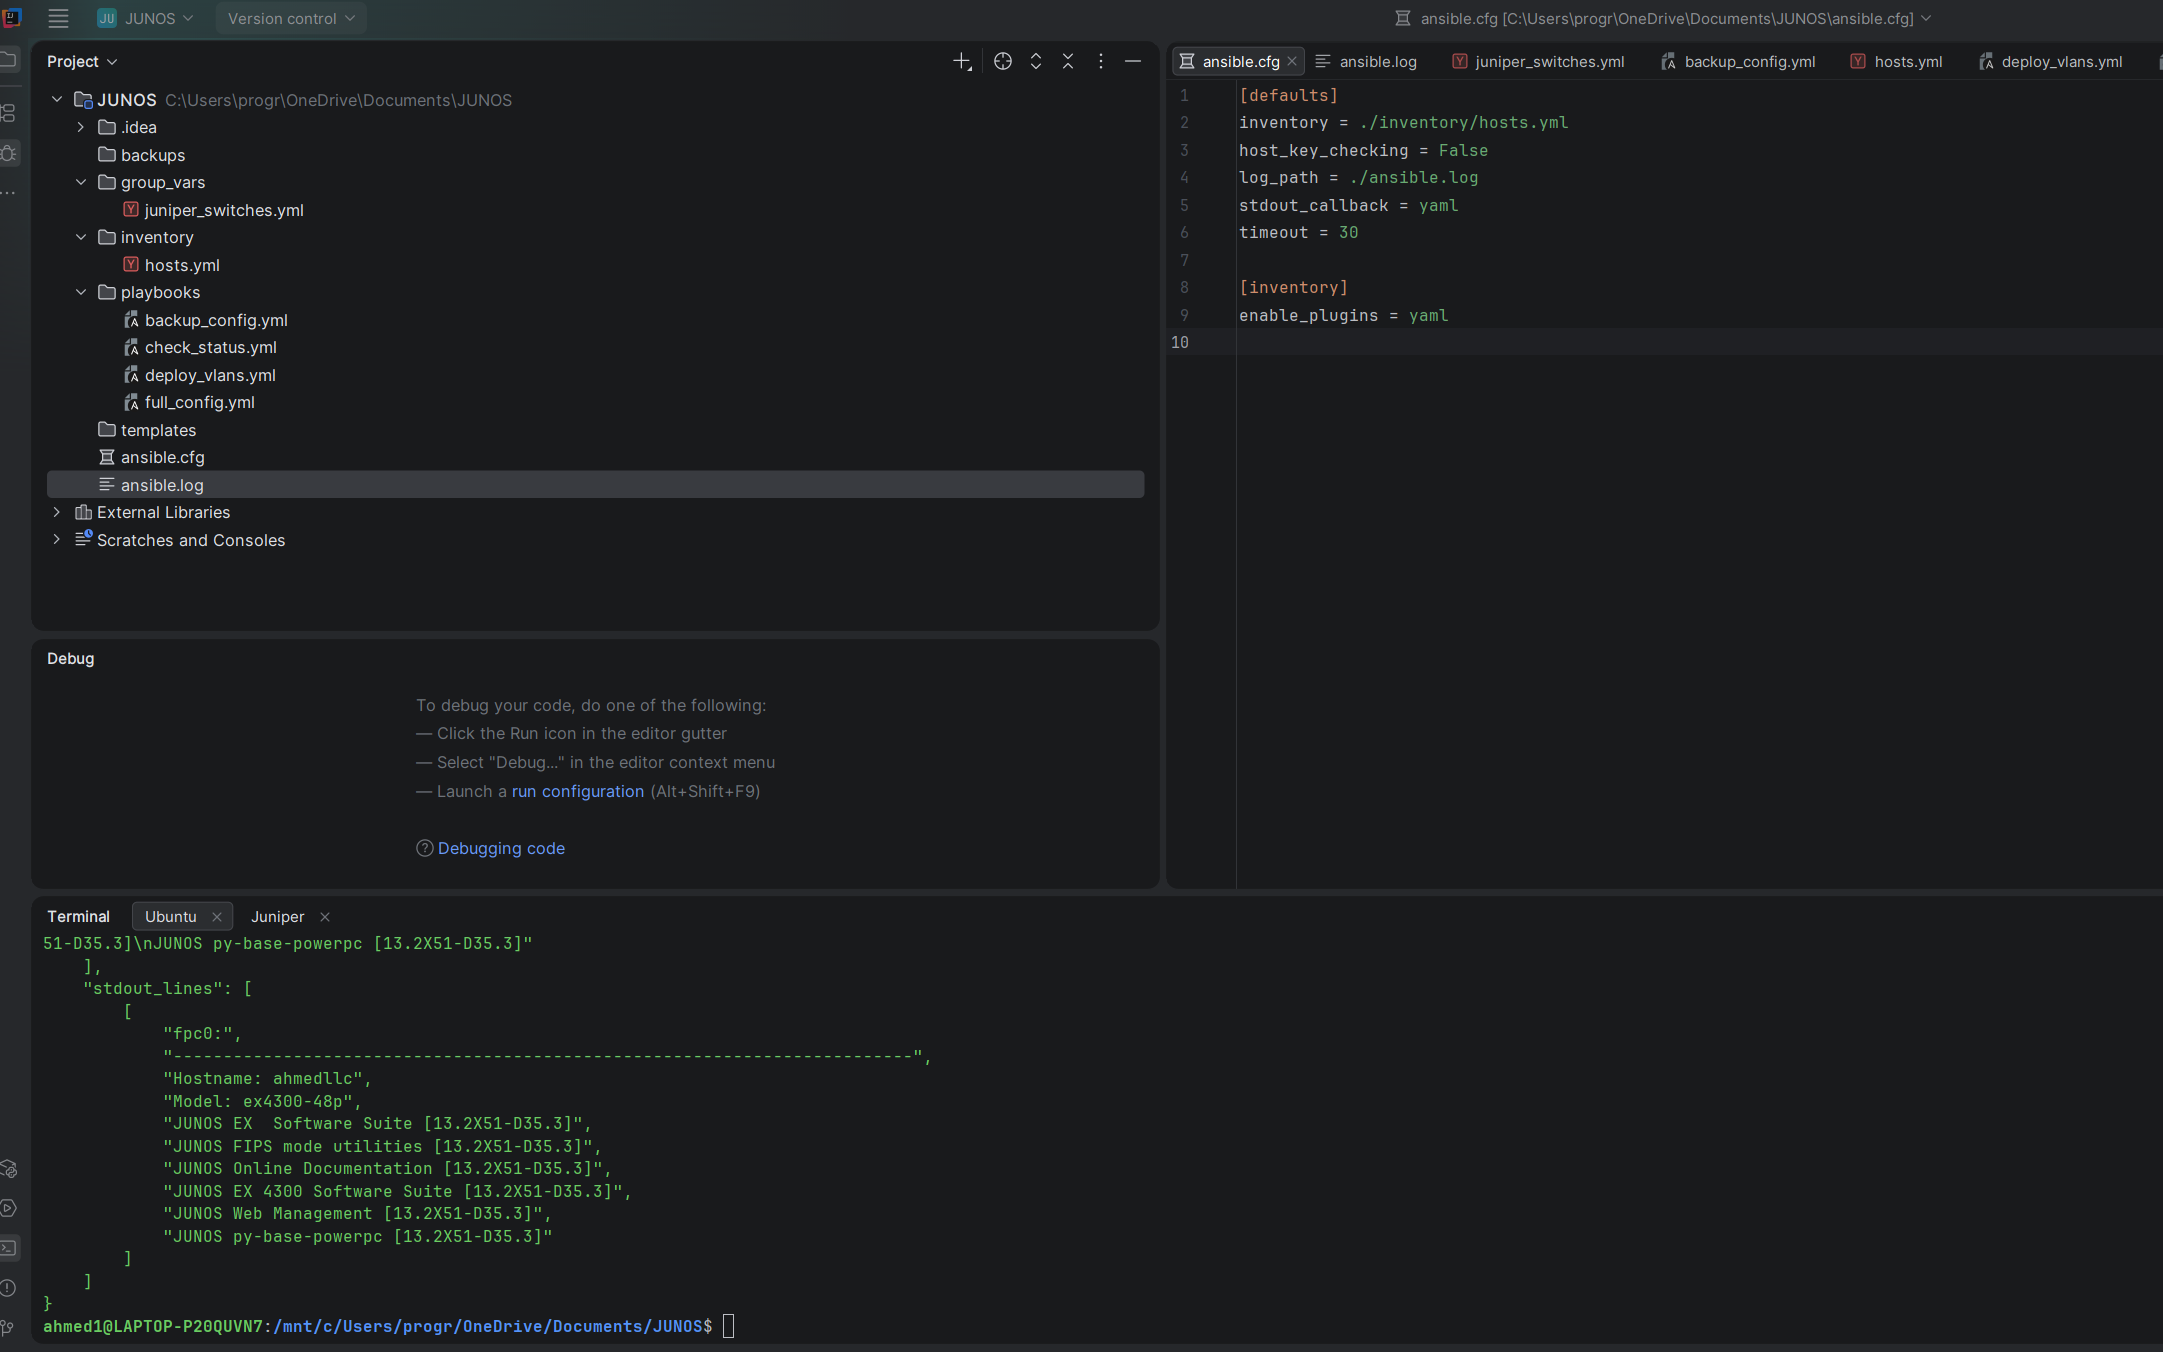
File: ansible.cfg
[defaults]
inventory = ./inventory/hosts.yml
host_key_checking = False
log_path = ./ansible.log
stdout_callback = yaml
timeout = 30

[inventory]
enable_plugins = yaml
This tells Ansible:
- Where to find your switches
- Don't bug me about SSH keys
- Log everything
- Use YAML output (easier to read)
Step 5: Define Your Switches
File: inventory/hosts.yml
---
all:
  children:
    juniper_switches:
      hosts:
        YYY-SWITCH-01:
          ansible_host: XXX.XXX.XXX.XXX
          ansible_network_os: junipernetworks.junos.junos
          ansible_connection: netconf
          ansible_user: YYY-ADMIN
          ansible_ssh_pass: YOUR-PASSWORD-HERE

      vars:
        ansible_python_interpreter: /usr/bin/python3
What each line means:
YYY-SWITCH-01- Your switch's name (anything you want)ansible_host- Switch's IP addressansible_network_os- Tells Ansible this is Juniperansible_connection: netconf- Use NETCONF (better than raw SSH)ansible_user/ansible_ssh_pass- Login credentials
Security note: Yeah, password in plain text sucks. We'll encrypt it later with Ansible Vault. For now, just get it working.
Step 6: Common Variables
File: group_vars/juniper_switches.yml
---
# VLANs configuration
vlans:
  - name: DATA
    vlan_id: 10
    description: "User Data VLAN"
    ip_address: XXX.XXX.10.1/24

  - name: VOICE
    vlan_id: 20
    description: "VoIP VLAN"
    ip_address: XXX.XXX.20.1/24

  - name: GUEST
    vlan_id: 30
    description: "Guest Network"
    ip_address: XXX.XXX.30.1/24

# Network settings
dhcp_server: XXX.XXX.XXX.XXX
dns_servers:
  - XXX.XXX.XXX.XXX
  - XXX.XXX.XXX.XXX
ntp_servers:
  - 0.pool.ntp.org
  - 1.pool.ntp.org
snmp_community: YOUR-COMMUNITY-HERE
timezone: America/New_York
domain_name: YYY.local
This is where all your network settings live. Change something here, deploy everywhere. Pretty slick.
Step 7: Your First Playbook - Backup
File: playbooks/backup_config.yml
---
- name: Backup Juniper Switch Configuration
  hosts: juniper_switches
  gather_facts: no

  tasks:
    - name: Get current configuration
      junipernetworks.junos.junos_command:
        commands:
          - show configuration | display set
      register: config_output

    - name: Save configuration to file
      copy:
        content: "{{ config_output.stdout[0] }}"
        dest: "./backups/{{ inventory_hostname }}_config_{{ ansible_date_time.date }}.txt"
      delegate_to: localhost

    - name: Show backup location
      debug:
        msg: "Configuration backed up to ./backups/{{ inventory_hostname }}_config_{{ ansible_date_time.date }}.txt"
What this does:
- Connects to your switch
- Runs "show configuration | display set"
- Saves it to a file with today's date
- Tells you where it saved it
Simple, clean, automated.
Step 8: Install Python Dependencies
Before running playbooks, you need some Python libraries:
# Install via apt (recommended)
sudo apt install python3-ncclient python3-paramiko python3-lxml -y

# OR via pip if you prefer
pip3 install ncclient paramiko lxml --break-system-packages
The ncclient library is what lets Ansible talk NETCONF to Juniper switches.
Step 9: Test Connection
Before running playbooks, test if Ansible can reach your switch:
ansible juniper_switches -i inventory/hosts.yml -m pingIf it works, you'll see:
YYY-SWITCH-01 | SUCCESS => {
    "changed": false,
    "ping": "pong"
}
If you get "pong" - you're golden.
Step 10: Run Your First Backup
ansible-playbook -i inventory/hosts.yml playbooks/backup_config.ymlYou should see:
PLAY [Backup Juniper Switch Configuration]

TASK [Get current configuration]
ok: [YYY-SWITCH-01]

TASK [Save configuration to file]
changed: [YYY-SWITCH-01]

TASK [Show backup location]
ok: [YYY-SWITCH-01]

PLAY RECAP
YYY-SWITCH-01    : ok=3    changed=1    unreachable=0    failed=0
Check your backups folder:
ls backups/
cat backups/YYY-SWITCH-01_config_2025-11-30.txt
Your entire switch config should be there!
VLAN Deployment Playbook
File: playbooks/deploy_vlans.yml
---
- name: Deploy VLANs to Juniper Switch
  hosts: juniper_switches
  gather_facts: no

  tasks:
    - name: Create VLANs
      junipernetworks.junos.junos_vlans:
        config:
          - name: "{{ item.name }}"
            vlan_id: "{{ item.vlan_id }}"
        state: merged
      loop: "{{ vlans }}"

    - name: Configure VLAN L3 Interfaces
      junipernetworks.junos.junos_config:
        lines:
          - "set vlans {{ item.name }} l3-interface irb.{{ item.vlan_id }}"
          - "set interfaces irb unit {{ item.vlan_id }} family inet address {{ item.ip_address }}"
      loop: "{{ vlans }}"

    - name: Commit configuration
      junipernetworks.junos.junos_config:
        comment: "Ansible VLAN deployment"
This reads your VLANs from group_vars and deploys them automatically. Add a VLAN to the vars file, run the playbook, done.
Status Check Playbook
File: playbooks/check_status.yml
---
- name: Check Juniper Switch Status
  hosts: juniper_switches
  gather_facts: no

  tasks:
    - name: Get system information
      junipernetworks.junos.junos_command:
        commands:
          - show version
          - show system uptime
          - show chassis alarms
      register: system_info

    - name: Get VLAN information
      junipernetworks.junos.junos_command:
        commands:
          - show vlans
      register: vlan_info

    - name: Display results
      debug:
        msg: "{{ system_info.stdout_lines }}"
Run this anytime you want to check on your switch without SSH'ing in.
Securing Passwords with Ansible Vault
Okay, passwords in plain text is bad. Let's fix it.
Encrypt your inventory:
ansible-vault encrypt inventory/hosts.ymlPick a vault password and remember it.
To edit later:
ansible-vault edit inventory/hosts.ymlRun playbooks with vault:
ansible-playbook -i inventory/hosts.yml playbooks/backup_config.yml --ask-vault-passNow your passwords are encrypted. Much better.
Daily Usage
Morning routine - backup everything:
ansible-playbook -i inventory/hosts.yml playbooks/backup_config.ymlCheck if everything's up:
ansible-playbook -i inventory/hosts.yml playbooks/check_status.ymlDeploy config changes:
# Edit group_vars/juniper_switches.yml
# Add your changes
ansible-playbook -i inventory/hosts.yml playbooks/deploy_vlans.yml
Got multiple switches? Just add them to inventory/hosts.yml and Ansible will configure ALL of them with one command. That's the power of automation.
Troubleshooting
"Module not found" error:
ansible-galaxy collection install junipernetworks.junos --force"Connection timeout":
# Check if switch is reachable
ping XXX.XXX.XXX.XXX

# Verify NETCONF is enabled
ssh your-user@XXX.XXX.XXX.XXX
show system services
"Permission denied":
- Check username/password in inventory
- Verify user has superuser access on switch
"ncclient not found":
sudo apt install python3-ncclient -yWhat I Learned
Coming from CCNA and Cisco gear, Ansible on Juniper is actually pretty smooth. The NETCONF connection is way cleaner than screen-scraping Cisco IOS.
Biggest differences from Cisco automation:
- Juniper uses NETCONF by default (no need for
enableand all that) - Config is always in "set" format (consistent, predictable)
- Commit model means you can stage changes without breaking stuff
- Rollback is built into the OS, not just Ansible
The playbook structure is the same regardless of vendor - you just use different modules. Makes sense once you wrap your head around it.
Next Steps
Things I want to add:
- Scheduled backups (cron job running the backup playbook)
- Config drift detection (compare running config vs intended config)
- Port configuration playbook
- User management playbook
- Maybe integrate with Git for version control
For now though, I can backup configs and deploy VLANs automatically. Good enough to get started.
Useful Commands
# Test connection
ansible juniper_switches -i inventory/hosts.yml -m ping

# Run a single command
ansible juniper_switches -i inventory/hosts.yml -m junipernetworks.junos.junos_command -a "commands='show version'"

# Backup configs
ansible-playbook -i inventory/hosts.yml playbooks/backup_config.yml

# Deploy VLANs
ansible-playbook -i inventory/hosts.yml playbooks/deploy_vlans.yml

# Check status
ansible-playbook -i inventory/hosts.yml playbooks/check_status.yml

# Edit encrypted files
ansible-vault edit inventory/hosts.yml

# Verbose output (for debugging)
ansible-playbook -i inventory/hosts.yml playbooks/backup_config.yml -vvv
Final Thoughts
Ansible isn't as complicated as I thought it'd be. The hardest part was just figuring out the folder structure and where everything goes. Once you have a working example, you can just modify it for whatever you need.
The YAML syntax takes some getting used to - indentation matters a LOT. Two spaces, not tabs. Mess that up and nothing works.
But overall? Pretty solid tool. Way better than manually configuring stuff, especially when you're dealing with multiple devices.
Glad I took the time to set this up. Should make studying for JNCIA easier too since automation is part of that exam.
Project Structure Recap
JUNOS/
├── ansible.cfg
├── inventory/hosts.yml (encrypted)
├── group_vars/juniper_switches.yml
├── playbooks/
│   ├── backup_config.yml
│   ├── deploy_vlans.yml
│   └── check_status.yml
└── backups/
Clean, organized, automated. That's the goal.
-Ahmed